Safe Wallet and Aurora: multisigs for Bitcoin

In this article, we will discuss how, by using Chain Signatures on Aurora, a Safe Wallet could control Bitcoin accounts and their assets.
This is an example of how a virtual chain could be a runtime environment for another blockchain lacking native smart contracts. The idea could generally be applied to any virtual chain and any accounts or contracts on it.
Acknowledgements
I want to say a big "Thank You" to the people helping me out while creating this demo:
- Michael Birch, for XCC and Chain Signatures consultations.
- Oleksandr Anyshchenko, for writing the main part of the Chain Signatures Signer contract and support with the demo.
- Diego Figueroa, for debugging a smart contract with me.
TL;DR
If you don't like to read, you can just watch the video below.
Jump to 3:35 if you want to see only the demo of how it works.
What problem is being solved?
Some blockchains lack smart contracts, such as Bitcoin, Ripple, etc. Or have non-EVM architectures and no Solidity contracts available. But you are an EVM dev who wants to build there. Also, you want to have a scalability of the NEAR Protocol at the tips of your hands.
Then NEAR Chain Signatures + a virtual chain, like Aurora, can resolve this problem for you!
I will demonstrate how it could be done by creating a Safe wallet on Aurora and controlling its derived Bitcoin address.
The demo explained
I wanted a Safe Wallet on Aurora to control the Bitcoin assets on the associated derived account.
To achieve this, we need two main steps:
- Sign a Bitcoin transaction with MPC service
- Relay this transaction to Bitcoin Network
To do this, two pieces of technology are combined:
- XCC.
- NEAR Chain Signatures (https://docs.near.org/concepts/abstraction/chain-signatures) (MPC + utils to derive accounts, form transactions).
This gives us an implementation of Chain Signatures on Aurora via a Solidity contract called Chain Signatures Signer.
You can read more about it in the documentation about Chain Signatures on Virtual Chains and the repo's README.md itself.
I believe that picture can convey the whole process in the best possible way, so here is it:
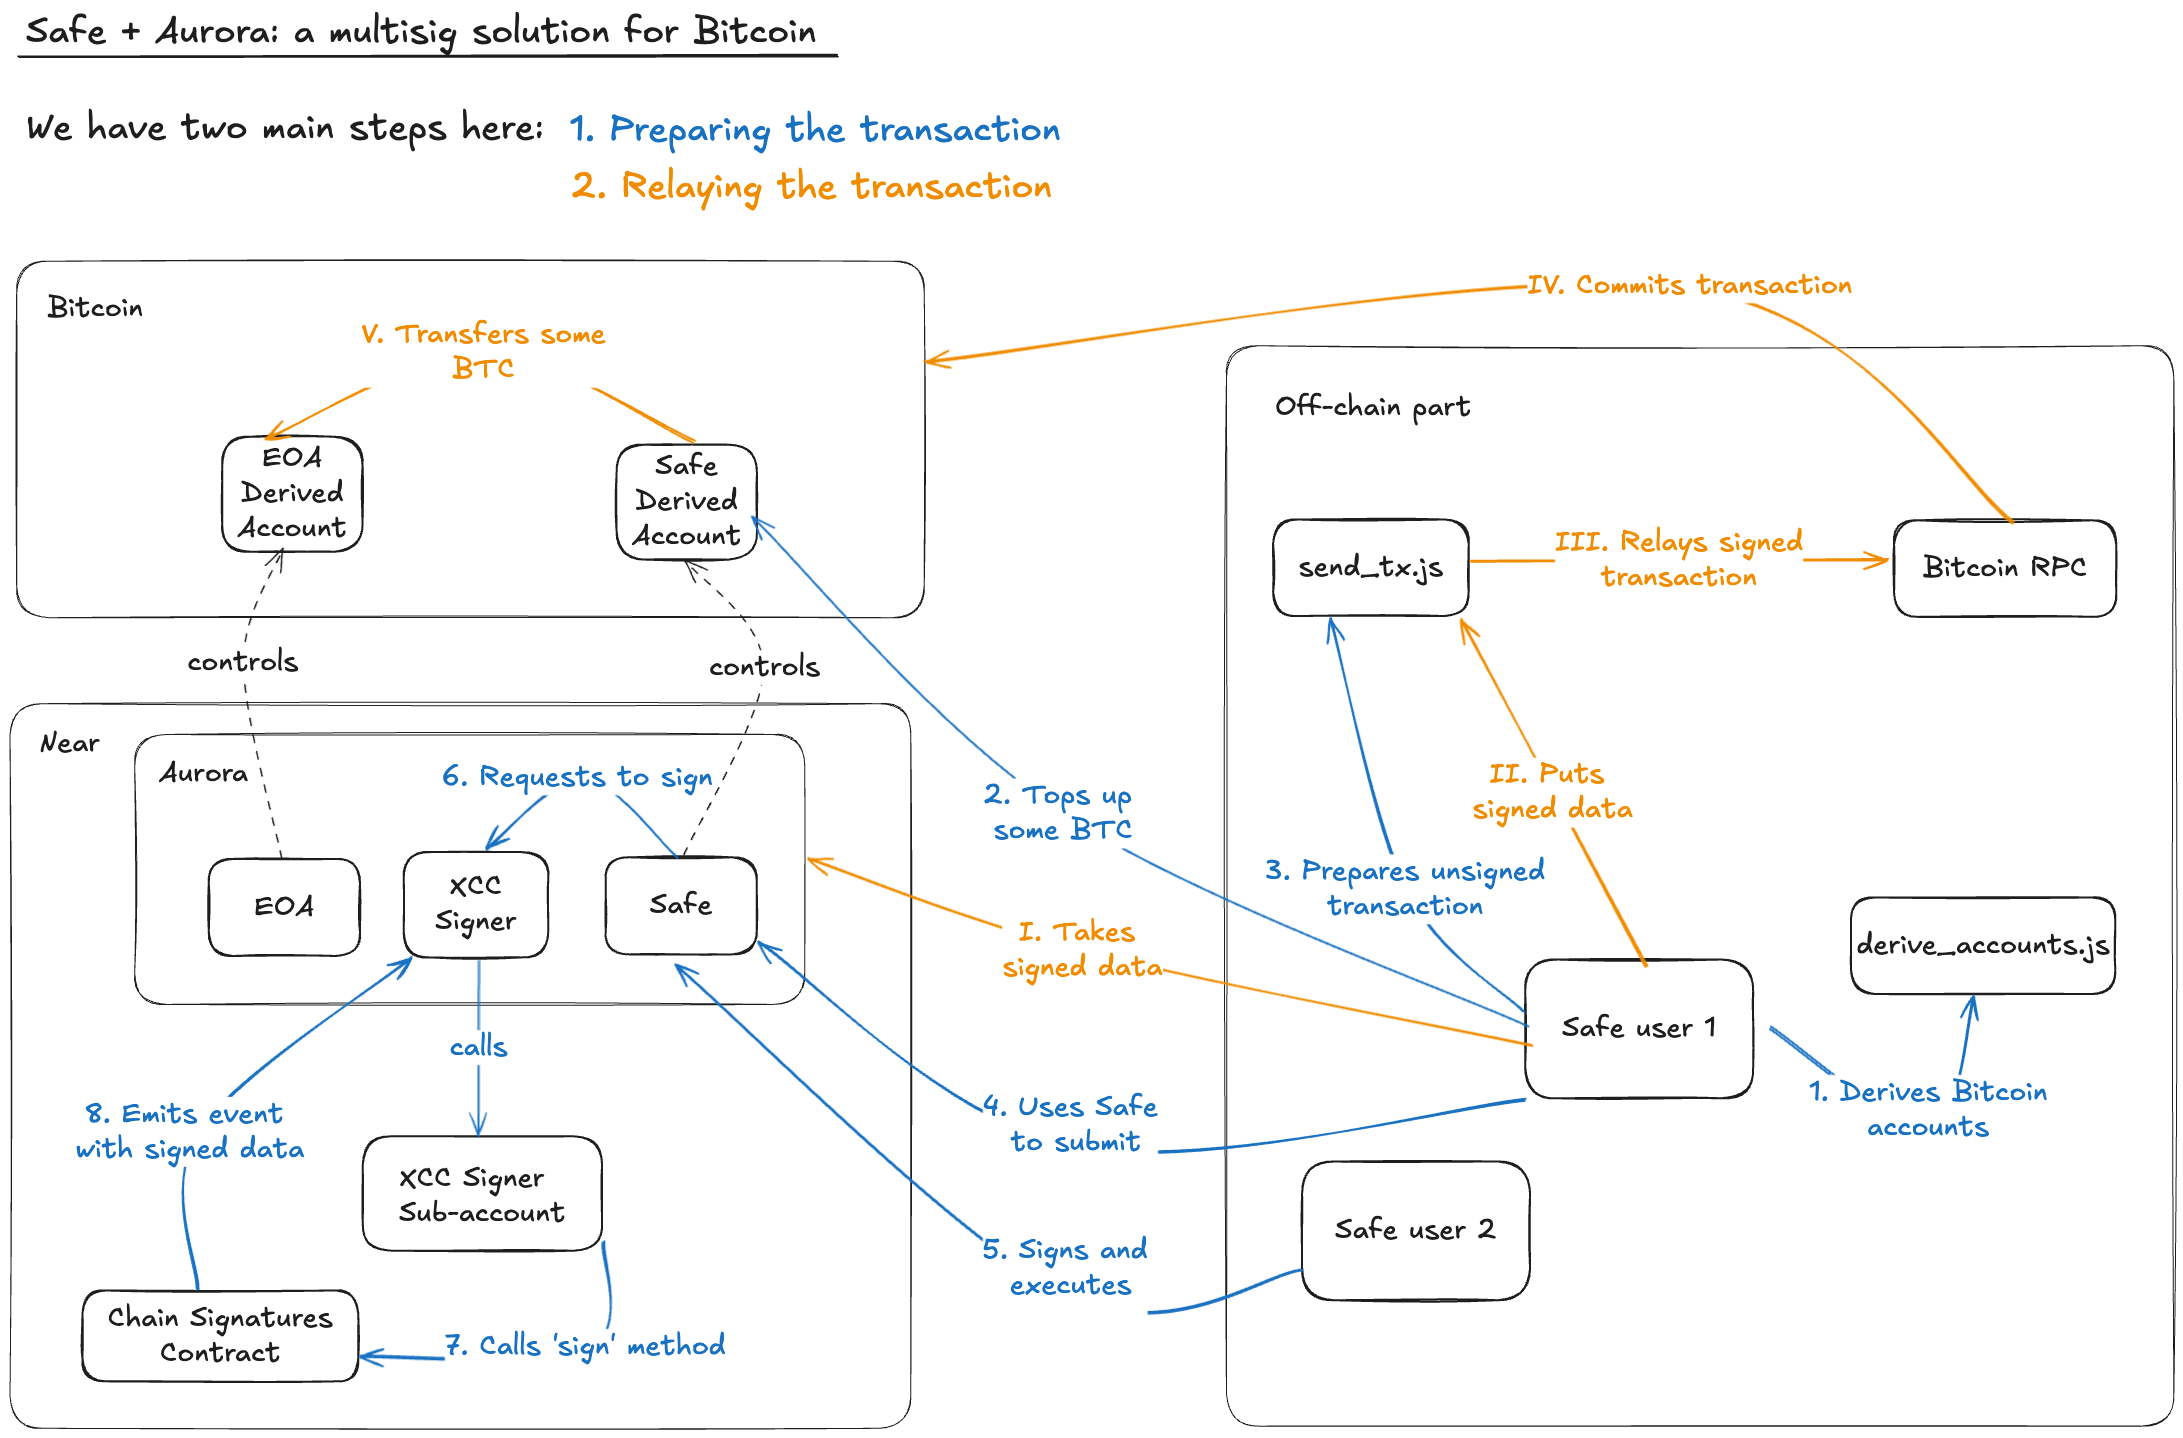
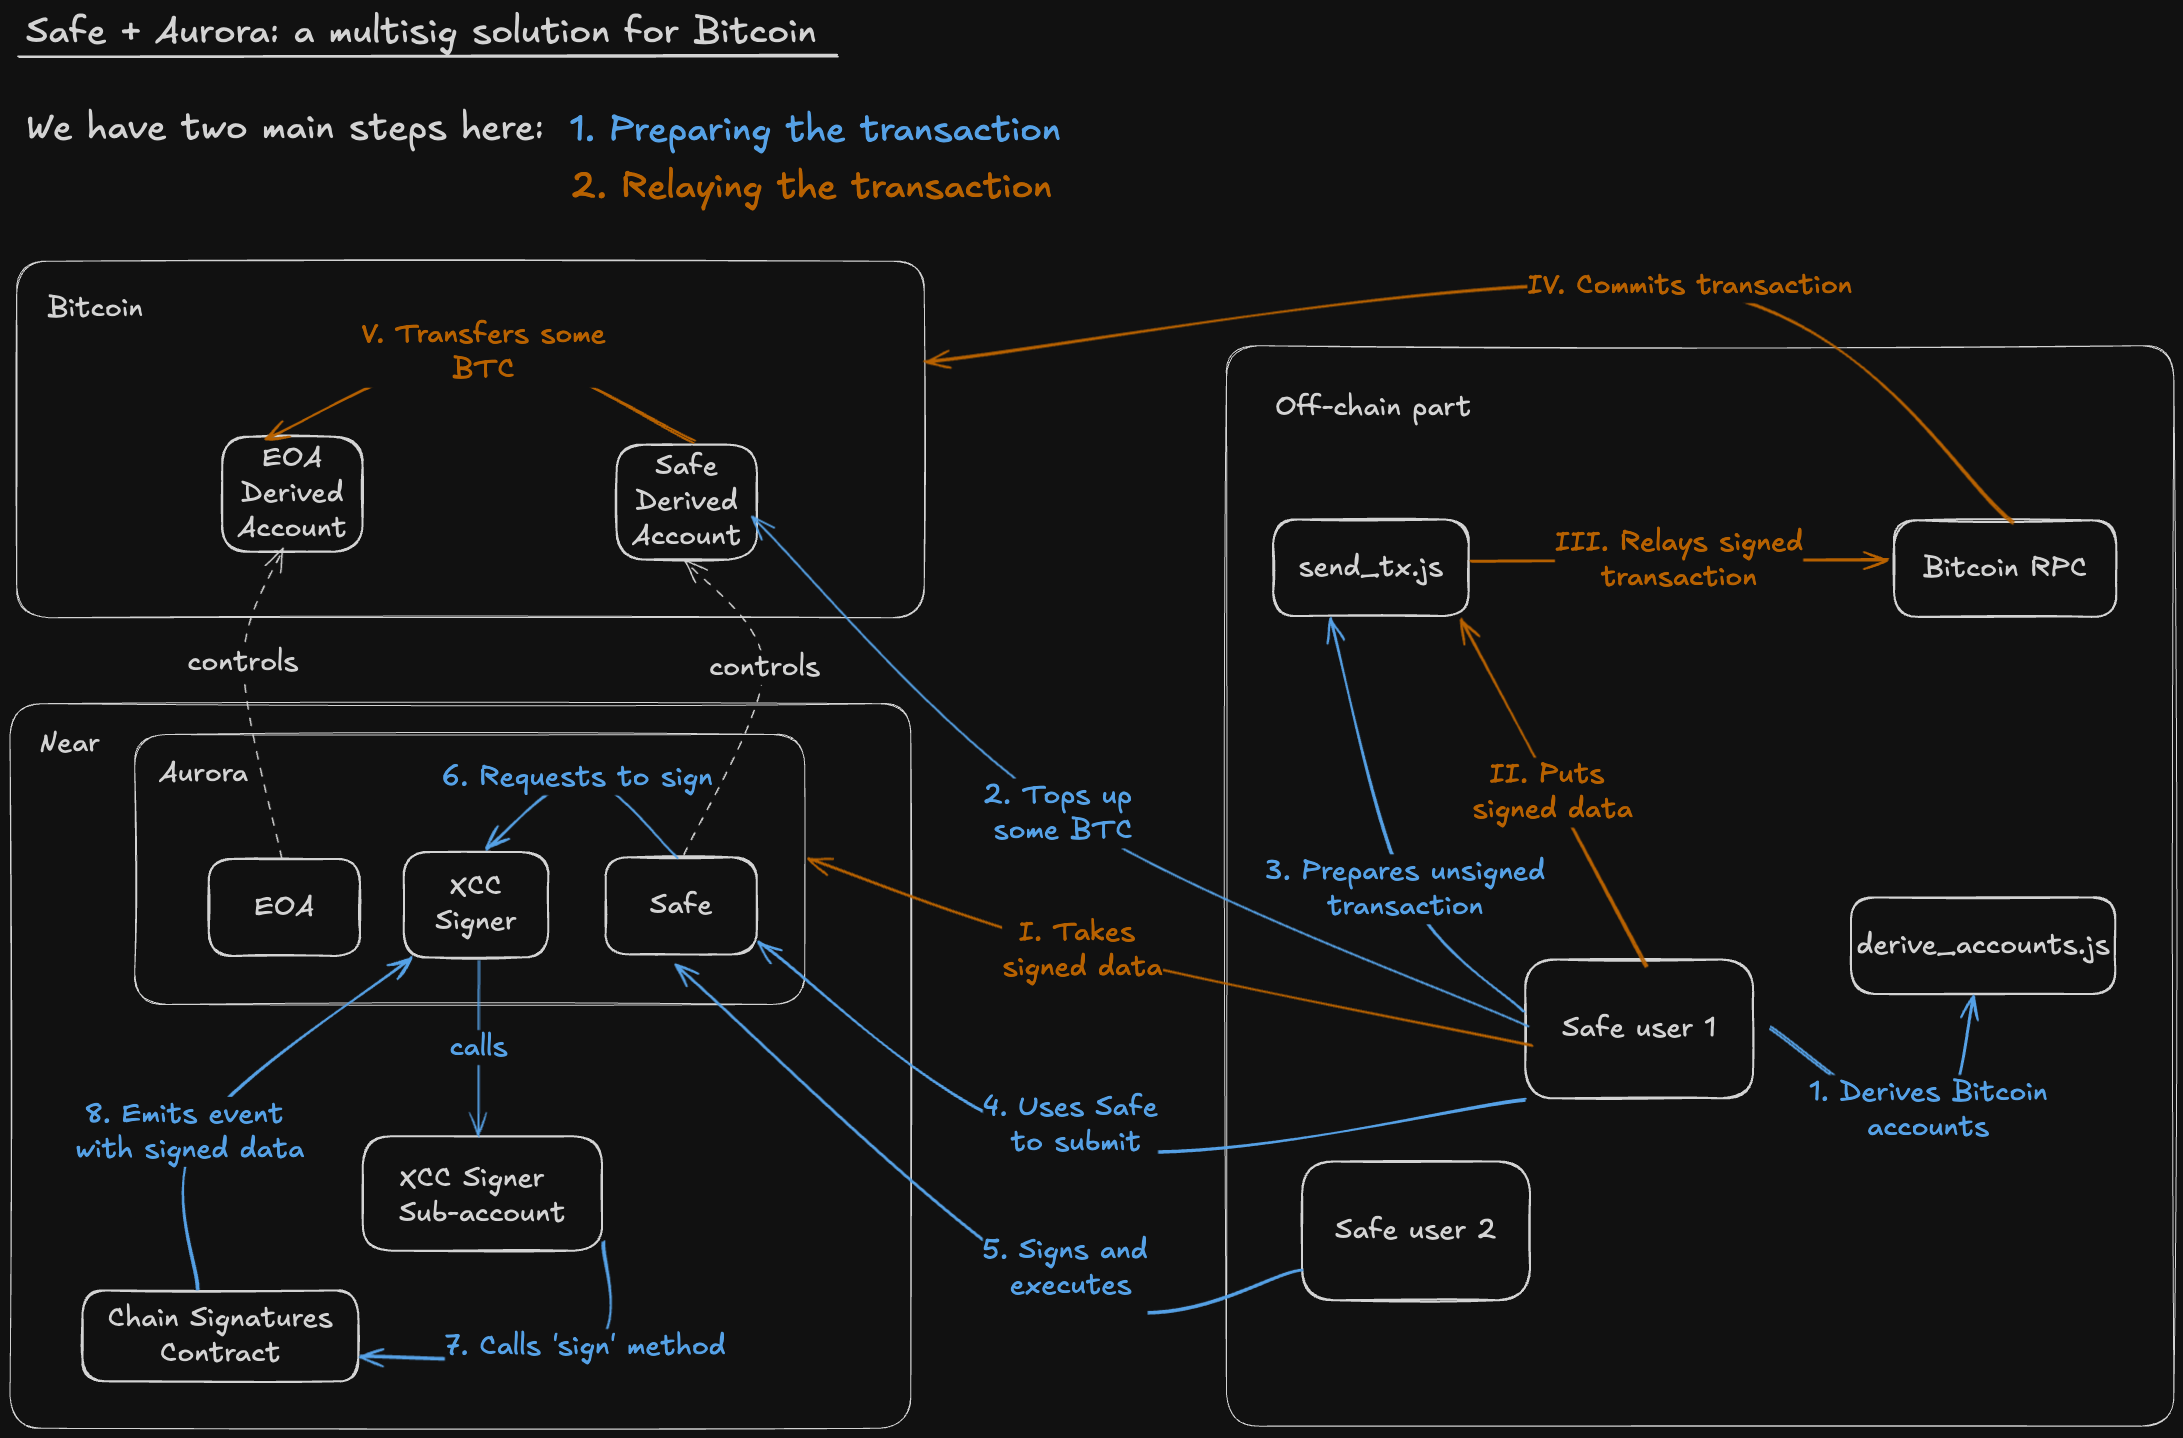
So, we have our Safe Wallet with two signers – Safe User 1 and Safe User 2 assigned to it. We assume Safe User 1 is doing most of the actions, and Safe User 2 just needs to confirm the transaction.
Let me repeat the steps from the image above in the text format here. The first step is creating and signing the Bitcoin transaction:
- User 1 derives Safe account on Bitcoin with derive_accounts.js.
- Tops it up with some Bitcoin (could be done via Near Intents)
- Prepares unsigned transaction with send_tx.js.
- Submits it to Safe via Transaction Builder as a call to the Chain Signatures Signer contract and signs the proposal to execute it.
- User 2 also signs the proposal.
signmethod is called on CS Signer.- XCC subbaccount of CS Signer calls the MPC contract on NEAR.
- MPC contract propels the callback back to EVM with signed data.
We already have Chain Signatures Signer contracts deployed to both Aurora Mainnet and Testnet: Mainnet Signer, Testnet Signer
And then second step - Relaying the transaction - is done:
- User 1 takes signed data
- Puts
big_affineandscalarvalue back into send_tx.js, whcih constructs a signed transaction with it. - send_tx.js relays the transaction to Bitcoin network.
- RPC executes it.
- Token transfer happens on Bitcoin network.
How it works
It is a pretty challenging task to explain everything in detail here. Here is a list of docs and resources that explain all parts needed to understand the demo perfectly:
- XCC
- Chain Signatures on Virtual Chains - fresh docs about how signing works on EVM side, it has integration instructions also.
- NEAR Chain Signatures
- NEAR Multichain Examples
I have created the next two repos here to make this demo happen:
- Chain Signatures Signer - Solidity contract to
signyour payload on NEAR MPC from EVM. - Chain Signatures JS Lib - some tools to derive accounts and relay the transaction taken from NEAR Multichain Examples
Feel free to reach me out on Discord; just mention @slava there, if you will have any questions.
Chain Signatures Signer
What is the main thing this contract does?
- It calls the MPC service on NEAR and signs your payload.
- Then it propagates the response back to the EVM.
It is done via the sign function call and receiving the response in the signCallback transaction.
Sign function
To call sign you will need to provide:
payload- the data to be signedversion-key_versionfrom chain signatures, check NEAR docs. At the moment, it is just 0.attachedNear- the amount of wNEAR to attach to the NEAR call. Usually, 1yoctoNEAR is enough, so you should just enter 1.
The code for the sign method looks like this:
    function sign(string memory payload, uint256 version, uint128 attachedNear) public {
        bytes memory _data = hexStringToBytes(payload);
        require(_data.length == 32, "Payload must be 32 bytes");

        // path is fixed here to make sure only msg.sender can use the derived
        // address via chain signature's of the xcc sub-account
        string memory path = addressToString(msg.sender);
        bytes memory data = createData(_data, path, version);

        PromiseCreateArgs memory callSign = near.call(signer, "sign", data, attachedNear,  SIGN_NEAR_GAS);
        PromiseCreateArgs memory callback = near.auroraCall(address(this), abi.encodeWithSelector(this.signCallback.selector), 0, SIGN_CALLBACK_NEAR_GAS);

        callSign.then(callback).transact();
    }
The main moments to focus on are:
- Ownership Preservation: The derivation path is equal to
addressToString(msg.sender);which ensures that only the EOA or contract who ismsg.sendercan operate the derived account on other networks. - Callback is optional: you can remove it and index the NEAR blockchain instead for the MPC response. It will save you some gas if you don't need the signed message back into your Solidity contracts.
- Gas for signature:
SIGN_NEAR_GASvalue can change in the future and be optimized. Right now, it is 50TGas.
Here is the transaction with sign call in it.
Sign callback
Function signCallback just propagates the MPC response back inside EVM and emits SignedEvent:
    function signCallback() public onlyRole(CALLBACK_ROLE) {
        PromiseResult memory result = AuroraSdk.promiseResult(0);

        if (result.status != PromiseResultStatus.Successful) {
            revert("SignCallback failed");
        }

        string memory output = string(result.output);
        emit SignedEvent(output);
    }
The output will contain the affine_point and scalar to reconstruct the signature. You can take a look at the example of such transaction.
Chain Signatures JS Lib
This lib is just a bunch of Node JS scripts to help you with NEAR Chain Signatures:
- Allows to derive BTC addresses on Mainnet and Testnet
- Create transactions for BTC transfers
Deriving your addresses on Bitcoin
Just go to src/derive_account.js and enter if you want to use mainnet or testnet, your NEAR address, and derivation path:
//Example
const BTC = new Bitcoin('mainnet'); // <- mainnet

const account = 'f7607cd922804daa9d54d21349dd6f9467098dde.aurora'; // <- XCC subaccount address, but you can use yours .near account instead

let path = '0x70ebe9fbc4e9920b07a1f043b2bede8fc2e09504'; // <-- derivation path, could be any seed, like 'bitcoin-1', 'bitcoin-2', etc. But in Safe BTC Demo we need it to correspond to the address on Aurora.
Now you can execute it:
node src/derive_account.js
You will get your account primary data, balance and UTXOs. Read more about account derivation.
Sending the transaction
Now, you can take the derived account data and use it inside src/send_tx.js script.
It was designed to execute a BTC transfer between two accounts.
Enter your data into some struct like:
const safe_account = {
    address: 'bc1qunau3q49dqewseky6nl9dqmq5fjsjfxmlkht8k',
    publicKey: '02ac2ac40a97879c728d0f9830996793b130aa5be0cf41f796ac7afcf739a72649',
    nearAccount: 'f7607cd922804daa9d54d21349dd6f9467098dde.aurora',
    path: '0x70ebe9fbc4e9920b07a1f043b2bede8fc2e09504'
};
You should also prepare the data for BTC transfer in these variables (around line 40):
const sats = 10000; // <-- amount of Satoshis to transfer
const path = safe_account.path; // <-- derivation path of source account
const pkey = safe_account.publicKey; // <-- pubkey of source account
const toAddress = '14secnpokXzrjRa3fEwcJ1RQKusCp3kTUA'; // <-- destination address
Now, you're ready to send the transaction:
node src/send_tx.js
After that, you will need:
- To sign it via a call to Chain Signatures Signer contract.
- To put the signed data back into your terminal.
Then, a transaction will be relayed and executed on the Bitcoin network.
Read more about relaying transactions.
Outro
That is it! Thank you for reading the article! I hope you liked it and learned a lot today!
Happy developing on virtual chains!
If you have any questions or suggestions, please visit our Discord Community!